Architecture
- n/a
-
Overview
Green-Field SCM is built using a Microsoft Stack
.net 4.8 (current version)
SQL Server 2012 +
SQL Server Reporting Services 2012 +

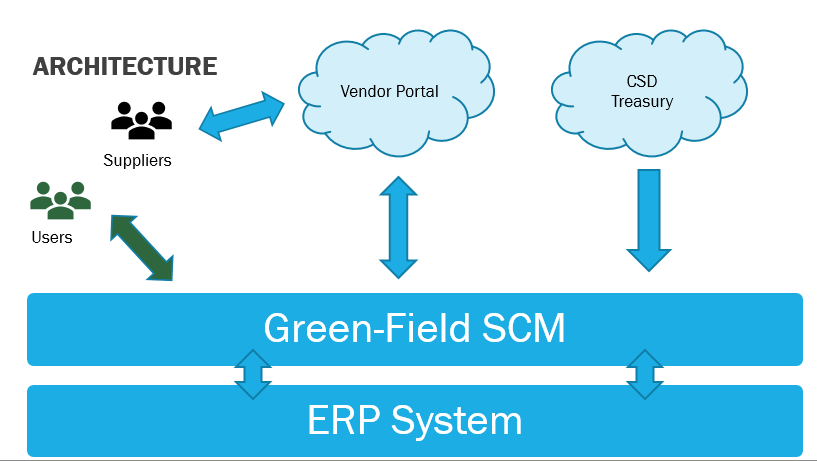
Main System Components
- Green-Field - This is the back office application (IIS Website)
- Portal - The vendor portal. This could be on a different server as Green-Field. Must be exposed to the Internet (IIS Website)
- Portal Service. This is the web service that allows Green-Field to communicate with the Vendor Portal. It must be installed on the same server as the Portal is hosted (IIS web service)
- Scheduler. An exe application to run scheduled items. It connects to all the relevant system.
- CoreCSD. An exe application used to download bulk files form CSD. This is used for offline verification
Green-Field -> Portal
Portal -> Green-Field
Green-Field -> ERP
ERP -> Green-Field
Internet Information System (IIS)
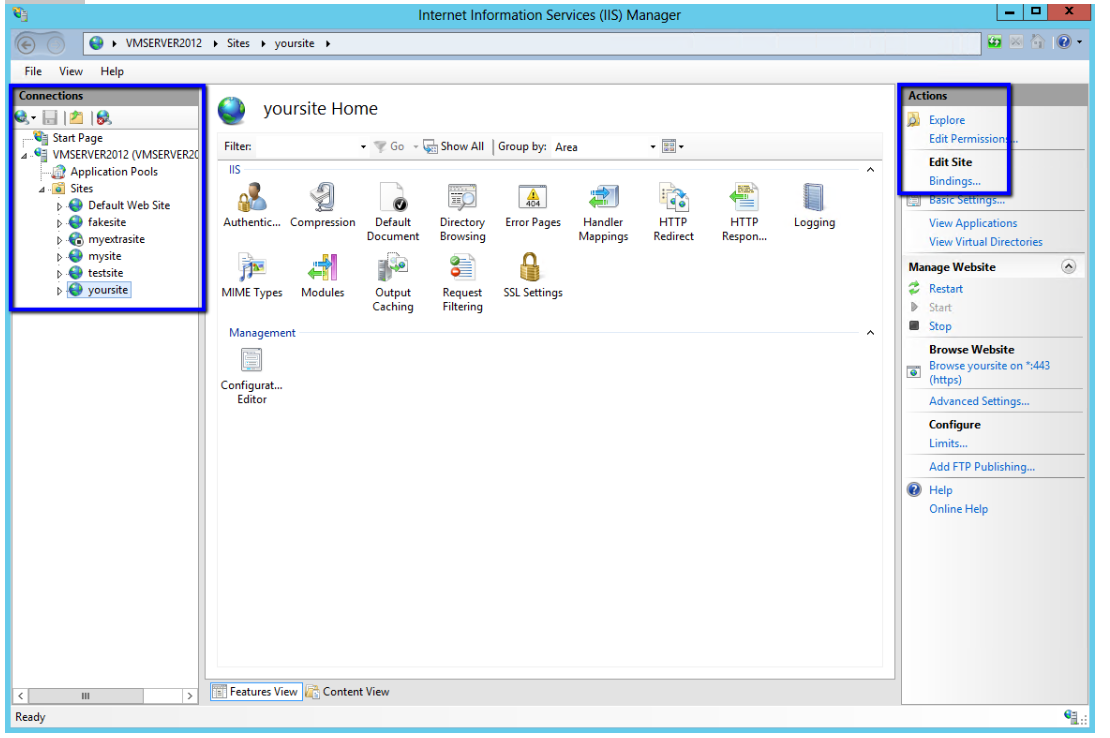
Setup a new web site IIS
- Log on to the Web server computer as an administrator.
- Create a folder. Normally c:\inetpub\wwwroot
- Copy the published application into the folder
- Ensure that the connection strings in the web.config files are pointing tot he correct SQL Server.
- Click Start, point to Settings, and then click Control Panel.
- Double-click Administrative Tools, and then double-click Internet Services Manager.
- Click Action, point to New, and then click Web Site.
- After the Web Site Creation Wizard starts, click Next.
- Type a description for the Web site. This description is used internally to identify the Web site in Internet Services Manager only.
- Select the IP address to use for the site.
- If you select All (unassigned), the Web site is accessible on all interfaces and all configured IP addresses.
- Type the TCP port number to publish the site on.
- Type the Host Header name (the real name that is used to access this site). Click Next.
- Either type the path to the folder that is holding the Web site documents or click Browse to select the folder, and then click Next.
- Select the access permissions for the Web site, and then click Next.
- Click Finish.

Microsoft SQL Server
The main system (excluding the vendor portal) consists of three databases.
- CoreCSD. This database stores all the data that's read from the CSD. this database does not have to backup up because it can be re-created from the CSD itself.
- GreenField_Audit. This is a legacy database that stores certain of the field level audit records
- GreenField. This is the main system database that contains all the data AND any attachments. The reporting server also uses it's own databases's but that is not discussed here.
Portal Databases
- GreenField_DNN. Used by DNN content management
- GreenField_Portal. Used to supplier data
- CoreCSD. Used for CSD integtation
Microsoft Reporting Services
The system uses Microsoft Reporting services for reporting. See the section below for instructions on how to deploy reports Deploy report to reporting services (ssrs)
Scheduler
Green-Fields scheduler consists of two parts.
- The scheduler itself which is scheduled to run at fixed intervals via the windows tasks scheduler.
- The actual scheduled tasks and their individual frequencies. Each can be set to run at different times and dates.
Scheduling the Scheduler
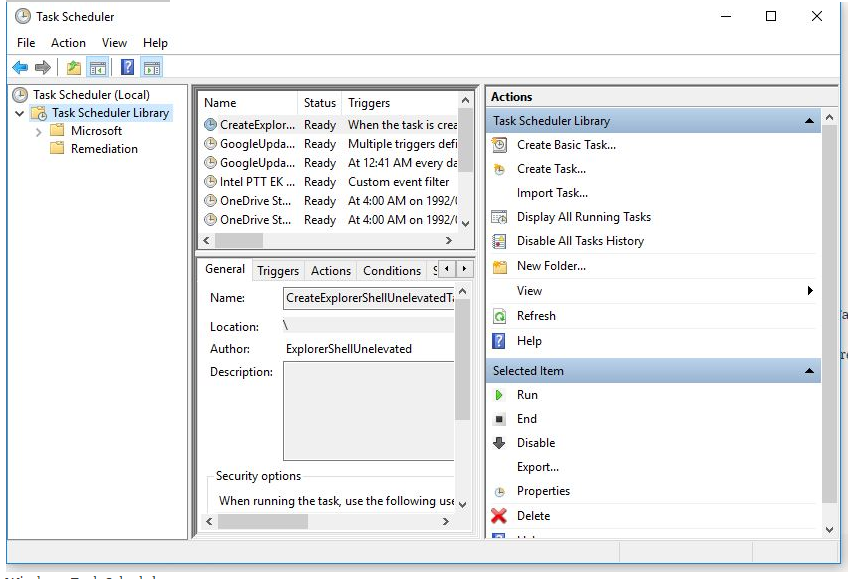
To set the scheduler's fixed interval follow these steps.
- From the Start menu, select Administrative Tools > Task Scheduler.
- In the Actions panel, click Create Basic Task.
- In the Create a Basic Task dialog, enter a name for the task and click Next.
- In the Task Trigger dialog, select your preferred frequency and click Next.
- In the Action dialog, select Start a program and click Next.
- In the Program/script field, browse and select the Green-Field task scheduler, then click Open.
- Remember to enter the path of the scheduler in the "start in" field Click Next.
- In the Summary dialog, select Open the Properties dialog for this task when I click Finish and then click Finish.
- The Maintenance Manager Properties dialog opens.
- If the Properties window for the Maintenance Manager task is not already open, double-click the task name in the Task Scheduler Library.
- The Properties window opens with the General tab displayed.
- Under Security Options, identify the domain/Windows account currently associated with the task. If it is not the correct account, click Change User or Group and select the Maintenance Manager domain/Windows account.
- Select Run whether user is logged on or not.
- Select Run with highest privileges option.
- Click OK.
- Ensure that the Maintenance Manager domain/Windows account is correct, enter the password, then click OK.
- Click OK to close the Properties window.
- Close the Task Scheduler.

Schedule Tasks to run
This is done from within Green-Field To view the status of any scheduled task to the admin home screen

This view only window will show tasks (it includes disabled ones), their current status, last run and next run dates.
To change these tasks to to Admin -> Sync Tool Not all tasks are enabled, the tasks used and their frequency is based on the system configuration and the modules used.
It is possible to execute the tasks from this window but it's not recommended as some of the tasks takes some time to complete and it could have a negative affect on the system's performance.
It's recommended to use the command prompt to run tasks on demand.
- Date Created
- 2020/04/17 15:12:36
- ID
- 31